The UI Layer: UI, Presenter and View Model
Lets discuss in more detail the components of the UI Layer
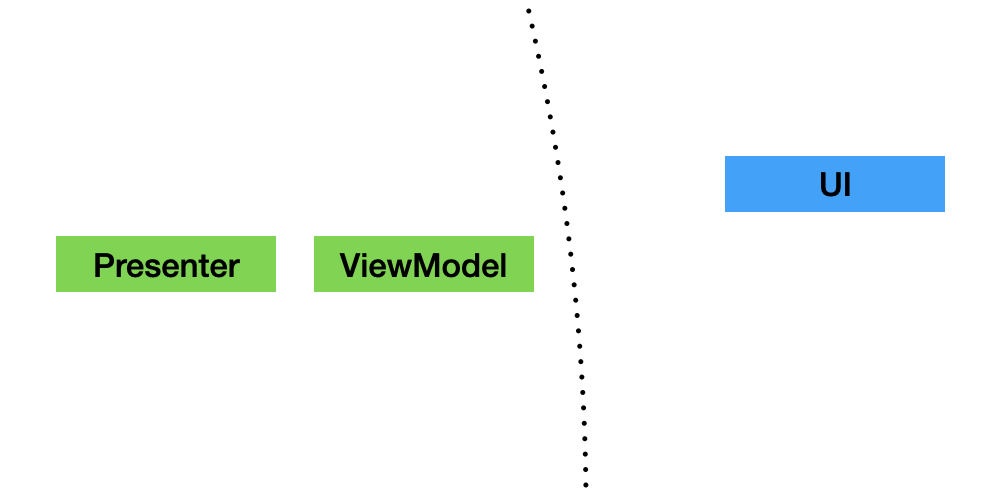
As mentioned on the previous topic, the UI component lives on the most external layer of the architecture. It means that it is related to specific libraries that conform the frontend of the application, in our case, the Flutter widgets libraries.
When building an app using the Clean Framework classes, we try to separate as much as possible any code that is not related to pure UI logic and put that on the Presenter (to send and receive data from internal layers) and the Use Case (the normal location for business logic).
UI is a class that behaves like a Stateless Widget. It will be very rare that a Stateful Widget is needed, since the state usage for important data breaks the layer rules. Try to always think on ways the UI widgets without the need for Stateful Widgets.
All UI implementations require at least one View Model to fetch data from the entities. This data comes from Use Case Outputs, which Presenters receive and translate as needed.
The feature you code can be expresed into multiple screens presented to the user, and even include small widgets that are inserted in other screens. These are your entry points to the feature, and as such, will require for the UI to listen to the state changes of the feature's Use Case through its Outputs. In other words, Use Cases can have multiple Outputs, that can have relationships with many View Models through the Presenters.
View Models are immutable classes, almost pure PODO's (Plain Old Dart Objects). We try to make them as lean as possible, because its only responsibility is the passing of digested data fields into the UI object.
They tend to have only Strings. This is intentional since the Presenter has the responsibility of any formating and parsing done to the data.
Finally, the Presenters purpose is to connect and listen to Use Case Providers to interact with the Use Case instance and pass messages for user actions done on the UI (through callbacks on the View Model) and also to trigger rebuilds on the UI when the state changes causes a new Output to be generated. This will be explained in detail on the following sessions, so for now just asume the Presenters associate with only one type of Output.
The most important job of the Presenter is to translate an Output instance and create a new View Model everytime the Output is received.
Testing and Coding the UI Layer
After a feature folder is created, any developer will probably try to start adding Flutter Widgets to build up the code requirements. This framework is flexible enough to allow you to start coding components that don't require to have any access or even knowledge of any possible dependency (databases, services, cache, etc), because those concerns belong to other layers.
The simplest way to start working on a new feature is to first decide how many UI elements will be required to complete the implementation of the feature. For the sake of simplicity we are going to considering only one widget for the single screen of the new feature.
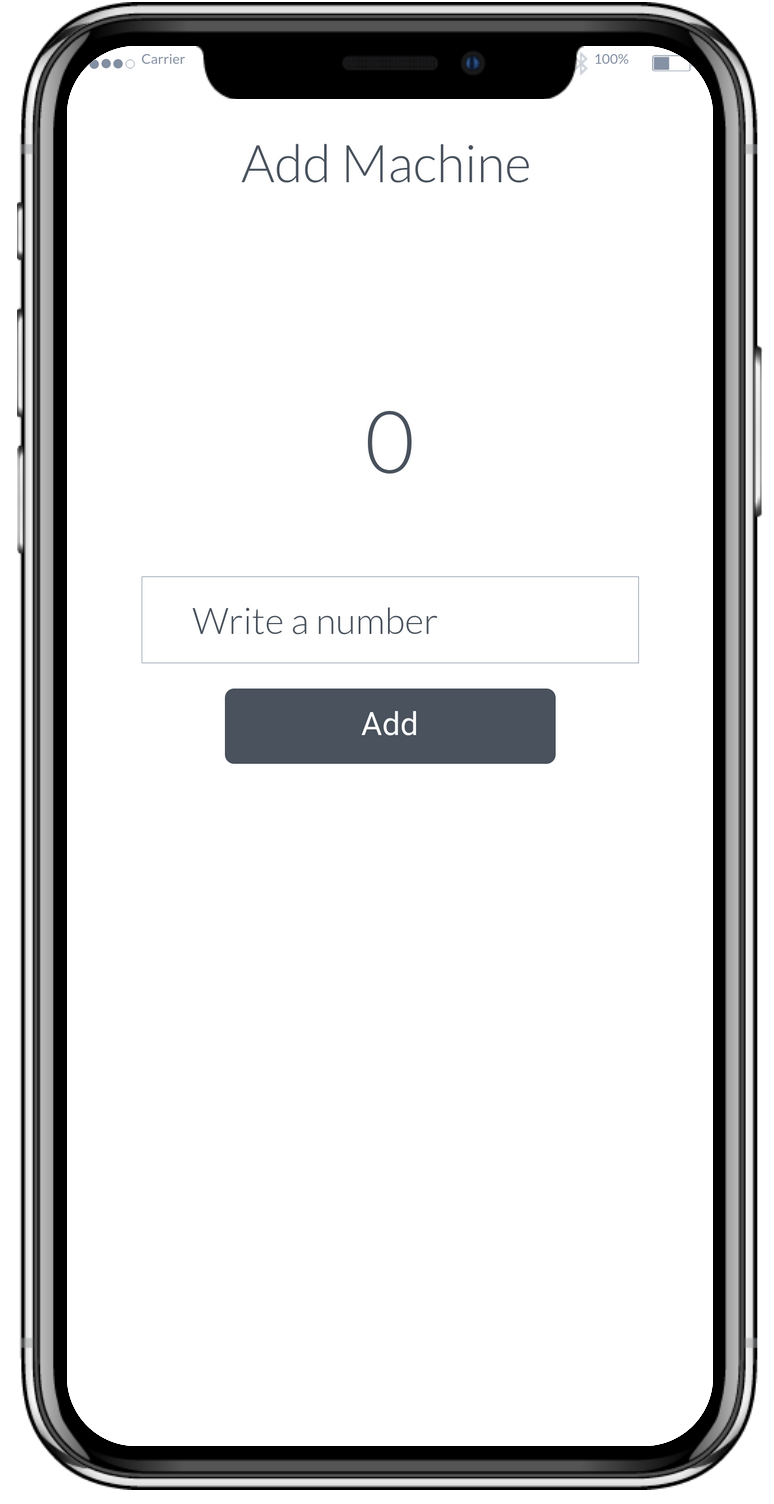
The feature requirements
We are going to code a very simple feature which can be explained in a few Gherkin scenarios:
Given I have navigated to the Add Machine feature
Then I will see the Add Machine screen
And the total shown will be 0.

Given I opened the Add Machine feature
When I write a number on the number field
And I press the "Add" button
Then the total shown will be the entered number.

Given I have entered a number on the Add Machine feature
When I write another number and press "Add"
Then the total shown will be the sum of both numbers.

Given I have added one or more numbers on the Add Machine feature
When I navigate away and open the feature again
Then the total shown is 0.
And this is the design of the page, which we have as reference, but the scope of the codelab won't be to focus on completing the code to reflect exactly the appearance, it will be up to you to finish the implementation.
The UI component test
UI components are extensions of Flutter Widgets, so this means the we have to use a Widget Tester. Our goal is to confirm that the data is retrieved correctly from the view model.
This is how our basic test looks like:
test/features/add_machine/presentation/add_machine_ui_test.dart
void main() {
    uiTest(
        'AddMachineUI unit test',
        context: ProvidersContext(),
        builder: () => AddMachineUI(),
        verify: (tester) async {

            expect(find.text('Add Machine'), findsOneWidget);

            final sumTotalWidget = find.byKey(Key('SumTotalWidget'));
            expect(sumTotalWidget, findsOneWidget);

            expect(find.descendant(of: sumTotalWidget, matching: find.text('0')), findsOneWidget);

        },
    );
}
After creating the initial blank project (using 'flutter create' for instance), you can add this test under the suggested path (features/add_machine/presentation).
Now, to explain the code:
-
Notice how we are using our own "tester" component, the uiTest function. This helper uses a Widget tester internally, but also helps on the setup of a MaterialApp with a proper provider context. The context allows the override of already defined providers if needed.
-
The builder creates an instance of a class that extends from the Clean Framework UI abstract class.
-
Verify is a function parameter to attach all the expects and actions done normally on widget tests.
The test is confirming that the first Gherkin scenario happens correctly, but of course the test cannot pass until we have coded the actual UI class. The first piece of code we have to provide is precisely this UI implementation.
But in practice, we not only need that. UI is coupled to a valid ViewModel, which gets translated from a specific Output inside a Presenter. So lets create the minimal code on these classes to make the test pass:
lib/features/add_machine/presentation/add_machine_ui.dart
class AddMachineUI extends UI<AddMachineViewModel> {
  AddMachineUI({required PresenterCreator<AddMachineViewModel> create})
      : super(create: create);

  @override
  Widget build(BuildContext context, AddMachineViewModel viewModel) {
    return Column(children: [
      Text('Add Machine'),
      Container(
        key: Key('SumTotalWidget'),
        child: Text(viewModel.total),
      ),
    ]);
  }

  @override
  create(PresenterBuilder<AddMachineViewModel> builder) {
    throw UnimplementedError();
  }
}
lib/features/add_machine/presentation/add_machine_view_model.dart
class AddMachineViewModel extends ViewModel {
  final String total;

  AddMachineViewModel({required this.total});

  @override
  List<Object?> get props => [total];
}
Let's review the code so far:
-
The UI class specifies by generics the usage of a AddMachineViewModel. This way the class can have access to any field of the model.
-
A constructor is provided to accept a creator function. This is normally not needed. The "normal" implementation instanciates the proper presenter on the create override. But to make the test pass we can have a presenter that doesn't use a Use Case provider, but builds a static view model instead. This is useful for unit tests that use fake presenters.
-
Since the presenter has a mocked behavior, the actual class is defined on the test file, and the create override is left as is (it will never be called on execution).
Now let's look at the necessary changes to the test itself:
test/features/add_machine/presentation/add_machine_ui_test.dart
void main() {
  uiTest(
    'AddMachineUI unit test',
    context: ProvidersContext(),
    builder: () => AddMachineUI(
      create: (builder) => AddMachinePresenter(builder: builder),
    ),
    verify: (tester) async {
      expect(find.text('Add Machine'), findsOneWidget);

      final sumTotalWidget = find.byKey(Key('SumTotalWidget'));
      expect(sumTotalWidget, findsOneWidget);

      expect(find.descendant(of: sumTotalWidget, matching: find.text('0')),
          findsOneWidget);
    },
  );
}

class AddMachinePresenter
    extends Presenter<AddMachineViewModel, AddMachineUIOutput, UseCase> {
  AddMachinePresenter({
    required PresenterBuilder<AddMachineViewModel> builder,
  }) : super(provider: addMachineUseCaseProvider, builder: builder);

  @override
  AddMachineViewModel createViewModel(UseCase<Entity> useCase, output) =>
      AddMachineViewModel(total: output.total.toString());

  AddMachineUIOutput subscribe(_) => AddMachineUIOutput(total: 0);
}

class AddMachineUIOutput extends Output {
  final int total;

  AddMachineUIOutput({required this.total});

  @override
  List<Object?> get props => [total];
}

final addMachineUseCaseProvider = UseCaseProvider((_) => UseCaseFake());
The Presenter, Output and UseCaseProvider are using as much fake data as possible to control the outcome of the test.
A complete Presenter
Now lets evolve our current code so we can test the second scenario. This is the test for it:
/// Given I opened the Add Machine feature
  /// When I write a number on the number field
  /// And I press the "Add" button
  /// Then the total shown will be the entered number.
  uiTest(
    'AddMachineUI unit test - Scenario 2',
    context: ProvidersContext(),
    builder: () => AddMachineUI(
      create: (builder) => AddMachinePresenter(builder: builder),
    ),
    verify: (tester) async {
      final numberField = find.byKey(Key('NumberField'));
      expect(numberField, findsOneWidget);

      await tester.enterText(numberField, '15');

      final addButton = find.byKey(Key('AddButton'));
      expect(addButton, findsOneWidget);

      await tester.tap(addButton);

      final sumTotalWidget = find.byKey(Key('SumTotalWidget'));
      expect(sumTotalWidget, findsOneWidget);

      expect(find.descendant(of: sumTotalWidget, matching: find.text('15')),
          findsOneWidget);
    },
  );
To make this test work, we will need to first move the Presenter code into its corresponding place inside the production features code, complete the implementation, and make the test use a fake Use Case that publishes a single static Output.
lib/features/add_machine/presentation/add_machine_presenter.dart
class AddMachinePresenter
    extends Presenter<AddMachineViewModel, AddMachineUIOutput, UseCase> {
  AddMachinePresenter({
    required UseCaseProvider provider,
    required PresenterBuilder<AddMachineViewModel> builder,
  }) : super(provider: provider, builder: builder);

  @override
  AddMachineViewModel createViewModel(useCase, output) => AddMachineViewModel(
      total: output.total.toString(),
      onAddNumber: (number) => _onAddNumber(useCase, number));

  void _onAddNumber(useCase, String number) {
    useCase.setInput<AddMachineAddNumberInput>(
        AddMachineAddNumberInput(int.parse(number)));
  }
}
lib/features/add_machine/presentation/add_machine_view_model.dart
class AddMachineViewModel extends ViewModel {
  final String total;
  final ValueChanged<String> onAddNumber;

  AddMachineViewModel({required this.total, required this.onAddNumber});

  @override
  List<Object?> get props => [total];
}
lib/features/add_machine/domain/add_machine_ui_output.dart
class AddMachineUIOutput extends Output {
  final int total;

  AddMachineUIOutput({required this.total});

  @override
  List<Object?> get props => [total];
}
lib/features/add_machine/domain/add_machine_add_number_input.dart
class AddMachineAddNumberInput extends Input {
  final int number;

  AddMachineAddNumberInput(this.number);
}

class AddMachineViewModel extends ViewModel {
  final String total;
  final ValueChanged<String> onAddNumber;

  AddMachineViewModel({required this.total, required this.onAddNumber});

  @override
  List<Object?> get props => [total];
}
About the code so far:
-
The Presenter got rid of the "subscribe" override since we will depend now entirely on an AddMachineUIOutput object from a provided use case.
-
When sending messages to the use case, we can either do it through a custom method or by using an Input, as we are doing here. Using the input helps us to not have to declare a custom Use Case, to make the test pass with as little code as possible.
-
The View Model has a new attribute, the callback that we will use to link the user action on the UI with an Input that is sent to the Use Case. Notice how callbacks are not considered part of the fieds used for equality comparisons.
-
Both input and output classes now are inside the proper folder. UI components can import from domain files, and at this point, only the Presenter and test mocks create instances of them.
We have to make fixes on the UI to add the new widgets:
lib/features/add_machine/presentation/add_machine_ui.dart
class AddMachineUI extends UI<AddMachineViewModel> {
  final UseCaseProvider provider;

  AddMachineUI({required this.provider});

  @override
  Widget build(BuildContext context, AddMachineViewModel viewModel) {
    final fieldController = TextEditingController();
    return Scaffold(
      body: Column(children: [
        Text('Add Machine'),
        Container(
          key: Key('SumTotalWidget'),
          child: Text(viewModel.total),
        ),
        TextFormField(
          key: Key('NumberField'),
          controller: fieldController,
          decoration: const InputDecoration(
              border: UnderlineInputBorder(), labelText: 'Write a number'),
        ),
        ElevatedButton(
          key: Key('AddButton'),
          onPressed: () => viewModel.onAddNumber(fieldController.value.text),
          child: Text('Add'),
        ),
      ]),
    );
  }

  @override
  create(PresenterBuilder<AddMachineViewModel> builder) =>
      AddMachinePresenter(provider: provider, builder: builder);
}
-
Notice that now the View Model has a callback field, which the UI calls to send the current number text to the Presenter. This is the goal of the code separation, we delegate the parsing and validation of the field value to the Presenter, which in turn can rely on the Use Case for complex validations.
-
We are intentionally creating a TextEditingController inside a build method. This is not what Flutter developers normally do, since any rebuild will override the current value, but for this simple feature this is enough. If this becomes an issue, then we suggest creating a wrapper widget around your field, with a state that handles the controller, just remember to avoid using the state for anything else.
Now that we have a full presenter implementation, the test can stop relying on the test presenter we coded previously, and change the mocks, now we need to mock the Use Case, as follows:
test/features/add_machine/presentation/add_machine_ui_test.dart
void main() {
  uiTest(
    'AddMachineUI unit test - Scenario 2',
    context: ProvidersContext(),
    builder: () => AddMachineUI(provider: addMachineUseCaseProvider),
    verify: (tester) async {
      final numberField = find.byKey(Key('NumberField'));
      expect(numberField, findsOneWidget);

      await tester.enterText(numberField, '15');

      final addButton = find.byKey(Key('AddButton'));
      expect(addButton, findsOneWidget);

      await tester.tap(addButton);
      await tester.pumpAndSettle();

      final sumTotalWidget = find.byKey(Key('SumTotalWidget'));
      expect(sumTotalWidget, findsOneWidget);

      expect(find.descendant(of: sumTotalWidget, matching: find.text('15')),
          findsOneWidget);
    },
  );
}

final addMachineUseCaseProvider = UseCaseProvider((_) => StaticUseCase([
      AddMachineUIOutput(total: 0),
      AddMachineUIOutput(total: 15),
    ]));

class StaticUseCase extends UseCase<EmptyEntity> {
  static int _index = 0;
  final List<Output> outputs;

  StaticUseCase(this.outputs) : super(entity: EmptyEntity());

  @override
  void setInput<I extends Input>(I input) {
    _index++;
    entity = EmptyEntity();
  }

  @override
  O getOutput<O extends Output>() {
    return outputs[_index] as O;
  }
}

class EmptyEntity extends Entity {
  @override
  List<Object?> get props => [];
}
Hopefuly by now you can appreciate the capacity of the Clean Framework components to help developers work with the UI layer without the need to first finish the Domain Layer code. You can even work in paralel with another developer that is doing it, while also having a high coverage on your code.
It has to be noted that this is very helpful to create MVP builds and have a working prototype that can be reviewed by stakeholders and QA teams, saving the development team a lot of headaches, since the feedback can be received sooner.